Install SharePoint 2013 - Step by Step
/
Andreas Glaser
How to successfully install SharePoint 2013 step by step as an administrator or developer.
Scenario
We will install SharePoint 2013 based on the following scenario:
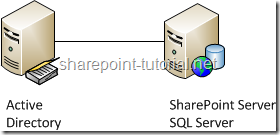
It's a
- SharePoint 2013 single-server installation, including
- basic installation accounts, and
- SQL Server and Windows Server setup.
PowerShell automation is not shown.
Back to top
Hardware and Software Requirements
Please make sure you meet all SharePoint 2013 hardware and software requirements.
In order to successfully install SharePoint 2013 you need to meet specific hardware, software, domain and account requirements. If you meet them before you start your installation you'll minimize waiting time and mistakes.
Back to top
Administrative and Service Accounts
You need the following accounts [1] in order to install SharePoint 2013.
Basic Installation Accounts
The following domain 3 basic accounts must be domain accounts and are required for every SharePoint 2013 installation:
Basic Installation Accounts
| Required Account |
Example |
| SQL Server Service Account |
sqlSvcAcc |
| SharePoint Setup Administrator |
spAdmin |
| SharePoint Farm Account |
spFarmAcc |
Service Accounts
Service accounts aren't needed for a successful SharePoint 2013 installation. You'll need the later to configure SharePoint after the installation has finished.
Assign Permission
The SharePoint 2013 setup administrator is the only account where you need to assign permission by yourself.
SQL Server Service Account
- Permission are assigned automatically during installation of SQL Server 2012.
- The SQL Server service account should be a domain account and is used to run SQL Server.
- If you have an existing SQL Server instance provided by your SQL Server team you don't need this account.
SharePoint Setup Administrator
- You need to manually assign permissions.
- The setup administrator is used to install SharePoint 2013.
- The SharePoint 2013 setup administrator has to be a member of the administrators group on every server SharePoint should be installed.

- This account also needs the securityadmin and dbcreator role in SQL Server.

- "If you run Windows PowerShell cmdlets that affect a database, this account must be a member of the db_owner fixed database role for the database." [1]
- If I create a development environment I also assign the sysadmin role during the setup of SQL Server 2012 so I have only one account I need to administrate Windows Server, SQL Server and SharePoint.
SharePoint 2013 Farm Account
Permissions are automatically assigned if you use the SharePoint 2013 setup administrator during installation.
The farm account is used for the following things [1]:
- Configure and manage the server farm.
- Act as the application pool identity for the SharePoint Central Administration website.
- Run the Microsoft SharePoint Foundation Workflow Timer Service.
Back to top
SQL Server 2012 Configuration
This guide shows you how to install and configure SQL Server 2012. The configuration includes assigning permissions and configuring networking.
SQL Server 2012 Installation
The following steps apply if you don’t have a SQL server yet. If you have a SQL Server 2012 instance you can skip to the step below: "SQL Server 2012 configuration".
Start the setup and choose a New SQL Server stand-alone installation.
Choose the SQL Server Feature Installation after you have accept the license agreement and entered the license key.


Please select at least the following minimum features:
- Database Engine Services
- Management Tools - Basic


Keep the default instance.
Add the SQL Server service account (in my case: sqlSvcAcc) plus password and keep the collation settings.


If you create a development environment add the current administrator and SharePoint 2013 setup administrator as SQL Server administrators.

Start the SQL Server 2012 installation.
SQL Server 2012 Configuration
Open SQL Server 2012 Management Studio and give the following permissions.
Assign the dbcreator and securityadmin server role to the SharePoint 2013 setup administrator which is in my case spAdmin.

Back to top
Windows Server 2012 Configuration
Usually I like to know which Windows Server 2012 role services and features are enabled: If you run the SharePoint 2013 prerequisites installer you won't see the exact configuration steps. Anyway it's sufficient for this scenario.
SharePoint 2013 Prerequisites Installer
The prerequisites installer installs and configures all SharePoint 2013 requirements but it doesn't show you in detail what it does.


Make sure everything installed successfully and restart your server if required.
The prerequisites installer also downloads required patches and hotfixes for Windows Server 2012. In case you want to download them manually please read: SharePoint 2013 hardware and software requirements.
Back to top
SharePoint 2013 Installation
SharePoint 2016 now comes with the new MinRole feature which configures a server for a specific role in a SharePoint topology like a Web Server or Application Server.
SharePoint 2013 Installation
Start the installation of SharePoint Server 2013 and enter the product key.

Install a complete SharePoint farm and keep the file location.

Run the SharePoint Products Configuration Wizard.

SharePoint 2013 Configuration Wizard
Create a new server farm and enter your SQL Server [SERVERNAME] and specify the SharePoint 2013 farm account.
I installed SQL Server and SharePoint 2013 in the same machine so I used localhost as the SQL Server name.


Enter a farm passphrase in case you want to add more SharePoint servers later.

Specify a port number and start the configuration.

Once the installation has finished you can open SharePoint 2013 Central Administration.

Once you see the SharePoint 2013 Central Administration you're done with the installation:

Back to top